Transitioning from a Monolith to the Jamstack

Fullstack Developer | Technical Writer | Freelancer 👩💻
Posts about Web Dev, Tech, and Entrepreneurship 📈
For a long time, the monolithic application structure has been the go-to, but as technology has moved on, new methods and structures have arisen. One of these is the Jamstack. In this article, we are going to take a look at how we can convert a monolithic application using a Node.js backend to a Jamstack application using Fauna, GraphQL, and serverless functions inside of Next.js via API routes.
In this post, we’ll be building a simple application that mimics a store. It’ll let us add items and then change the quantity of each item. For this tutorial, we are stripping the example down to its bare basics and not worrying about things like authentication and handling payments. Instead, we are purely focusing on the element of storing and querying data.
Note: In this article, we will build the application for the Jamstack, but will only be talking about the configuration and setup of a monolithic application. For this reason, a lot of the steps required to build a monolithic application will be omitted for brevity as it is beyond the scope of this article.
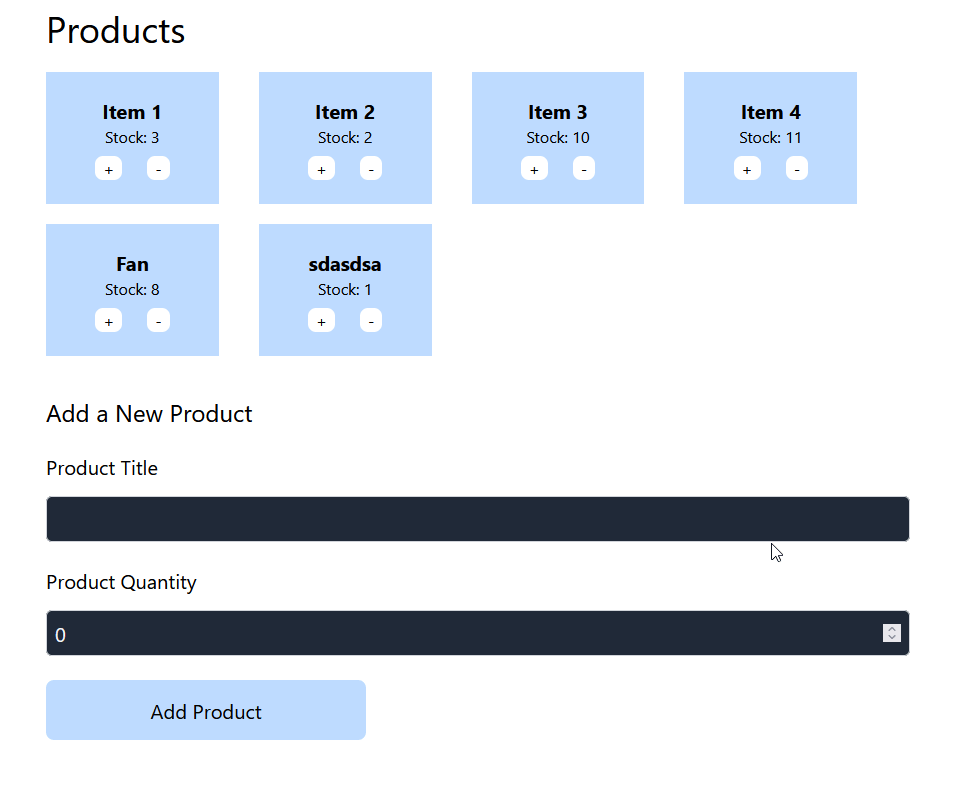
This is generally how we want it to look and function in the end:
Building out our frontend
For the frontend of the application, we will be using Next.js. There are a couple perks to this — we will be able to both configure our Next.js to work with our monolithic Express server example as well as then convert it to use the Jamstack architecture of Fauna and GraphQL.
Let’s use this template from Vercel so we can easily connect and consume Fauna when we build it out later in this post. I won’t be running through the initial configuration of setting up the template and cloning it to our local environment here for the sake of brevity. Once you have the code cloned to your local machine, we can delete the code inside of the pages/index.js file and remove anything inside the pages/api directory. Our frontend will be completely contained within that index.js file, so we don’t need to worry about importing any external components.
Inside of index.js, we’ll start with this:
import { useState } from 'react';
import 'tailwindcss/tailwind.css';
import useSWR, { mutate } from 'swr';

const PRODUCTS_PATH="SERVER_ADDRESS"

// function used to send a post request to the passed URL.
const putProduct = async (payload) => {
  return fetch(PRODUCTS_PATH, {
    method: 'POST',
    body: JSON.stringify(payload),
    headers: {
      'Content-Type': 'application/json',
    },
  }).then((res) => {
    return res.ok ? res.json() : Promise.reject(res);
  });
};

const useProductsFlow = () => {
    const { data: products } = useSWR(PRODUCTS_PATH);

  // Perform POST request to passed URL with the passed in values
  const onSubmit = async (payload) => {
    await putProduct(payload);
    await mutate(PRODUCTS_PATH);
  };

  return {
    products,
    onSubmit
  };};

const AddProductForm = ({ onSubmit: onSubmitProp }) => {
  const initial = {
    title: '',
    quantity: 0,
  };
  const [values, setValues] = useState(initial);
  const [formState, setFormState] = useState('initial');
  const isSubmitting = formState === 'submitting';

  // Handling the submit of our form.
  const onSubmit = (ev) => {
    ev.preventDefault();

    setFormState('submitting');
    // Submit the form using the function declared in useProductsFlow
    onSubmitProp(values)
      .then(() => {
        setValues(initial);
        setFormState('submitted');
      })
      .catch(() => {
        setFormState('failed');
      });
  };

  // On change, update the state for the form values.
  const makeOnChange = (fieldName) => {
    return ({ target: { value, valueAsNumber } }) => {
      if (fieldName === 'quantity') {
        return setValues({
          ...values,
          [fieldName]: valueAsNumber,
        });
      }
      return setValues({
        ...values,
        [fieldName]: value,
      });
    };
  };

  const inputClasses =
    ' border block p-2 bg-white dark:bg-gray-800 rounded-md border-gray-300 focus:ring-blue-500 focus:border-blue-500 text-gray-900 dark:text-gray-100';

  return (
    <form className="flex flex-col justify-start text-xl" onSubmit={onSubmit}>
      <div className="flex flex-col gap-4">
        <label htmlFor="title">Product Title</label>
        <input
          required
          className={inputClasses}
          type="text"
          name="title"
          id="title"
          value={values.title}
          onChange={makeOnChange('title')}
        />
      </div>
      <div className="flex flex-col gap-4 mt-6">
        <label htmlFor="quantity"> Product Quantity</label>
        <input
          required
          className={inputClasses}
          type="number"
          name="quantity"
          id="quantity"
          value={values.quantity}
          onChange={makeOnChange('quantity')}
        />
      </div>
      <button
        className="bg-blue-200 mt-6 p-4 max-w-xs rounded-lg"
        type="submit"
        disabled={isSubmitting}
      >
        Add Product
      </button>
    </form>
  );
};

const Products = () => {
  // Bring in the products to display and functions used to update the data.
  const { products, onSubmit } = useProductsFlow();

  return (
    <main className="max-w-4xl mx-auto p-4 text-left flex-col">
      <div>
        <h1 className="text-4xl mb-6">Products</h1>
        <div className="flex flex-wrap gap-x-10 gap-y-5 justify-start">
          {products?.map(({ title, quantity, _id }) => {
            return (
              <div
                key={_id}
                className="bg-blue-200 p-6 min-w-[20%] text-center"
              >
                <h2 className="font-bold text-xl">{title}</h2>
                <p>Stock: {quantity}</p>
                <div className="flex rounded-sm justify-evenly width-full mt-2">
                  <button
                    type="button"
                    onClick={() => {
                      return onSubmit({
                        id: _id,
                        quantity: quantity + 1,
                        title,
                      });
                    }}
                    className="px-2 bg-white rounded-lg"
                  >
                    +
                  </button>
                  <button
                    type="button"
                    onClick={() => {
                      return onSubmit({
                        id: _id,
                        quantity: quantity - 1,
                        title,
                      });
                    }}
                    className={`px-2 bg-white rounded-lg ${quantity === 0 ? 'opacity-60' : ''}`}
                    disabled={quantity === 0}
                  >
                    -
                  </button>
                </div>
              </div>
            );
          })}
        </div>

        <h2 className="text-2xl mt-10 mb-6">Add a New Product</h2>
        <AddProductForm onSubmit={onSubmit} />
      </div>
    </main>
  );
};
If you’re curious about how all this works, I’ve put comments in some important places. Otherwise, we’re not so worried about the frontend as much as the logic behind it, so let’s now turn our focus to how this would interact with a monolithic server.
A typical monolithic backend
Inside of the frontend we just defined, you will notice the variable PRODUCTS_PATH — we need to update this to our server address. Running the server locally, you could use http://localhost:3000, or, if you were deploying the server, then you would need to add in the server address given to you. Because this is just a theoretical example, we will leave the variable as is.
We can then look at defining our Node.js server to handle incoming requests and communicate them to the database. In our example, we will imagine that we have an SQL database setup and connected to our server. Here is an example of a Node.js backend that can handle GET and POST requests.
const express = require('express')
const app = express()
const port = 3000

app.get('/', async (req, res) => {
    // Our fetchProducts function here would send a request to our SQL DB to return all products
  const entries = await fetchProducts();
  res.json(entries);
})

app.use('/', (req, res, next) => {
    // If the request method isn't a 'POST' then exit the middleware.
    if (req.method !== 'POST') {
        next();
    }

    const {body: { title, quantity, id }} = req;

    try {
            // updateProduct would send a request to our DB to update the product
      const updated = await updateProduct(
                id,
        title,
        quantity,
      );
      res.json(updated);

      // If updating fails, then create a new product on the DB
    } catch (e) {
      const created = await createProduct(
        title,
        quantity,
      );
      res.json(created);
    }

  next();
});

app.listen(port, () => {
  console.log(`Example app listening on port ${port}`)
})
With this backend setup, every time we load the page, a GET request is sent off to our Node.js server to retrieve the list of items in the database. When we want to update or create a new product in the DB, then we’d send a POST request to the server to carry out the appropriate action.
However, an inherent downside of using a monolithic backend like this is that the server needs to be running all the time, ready to handle any requests should they come in. This means we’re paying for the uptime and maintenance of this server that might spend a large portion of its day not actively processing requests.
However, hope is not lost! This is where a transition to Jamstack and serverless functions can help. Let’s now take a look at the steps required to transition a monolithic backend like this into a fully working Jamstack application using Fauna, GraphQL and serverless functions in Next.js.
Migrating to the Jamstack
With our monolithic example out of the way, let’s now take a look at how we can transform it into a Jamstack application with Fauna and GraphQL. The good news is we can use the same frontend, which is why we templated it out first. Another big difference between using Jamstack and using a monolithic structure is how we source the data from the DB (we will come to this in a moment).
To start our transition to Fauna, let’s first create our GraphQL schema. Inside of our code we cloned from the template earlier on, there is a schema.gql file; open that up and replace the existing code with the below.
type Product {
  title: String!
  quantity: Int!
}

type Query {
  getAllProducts: [Product]
}
These few lines are all we need to define how we’ll get our data back from Fauna through GraphQL. We have a Product type that defines the shape of the data that we will be sending and receiving from Fauna. It also means that when we upload the schema in a moment, it will create a new collection for us called Product, where we can upload inventory data from a previous database.
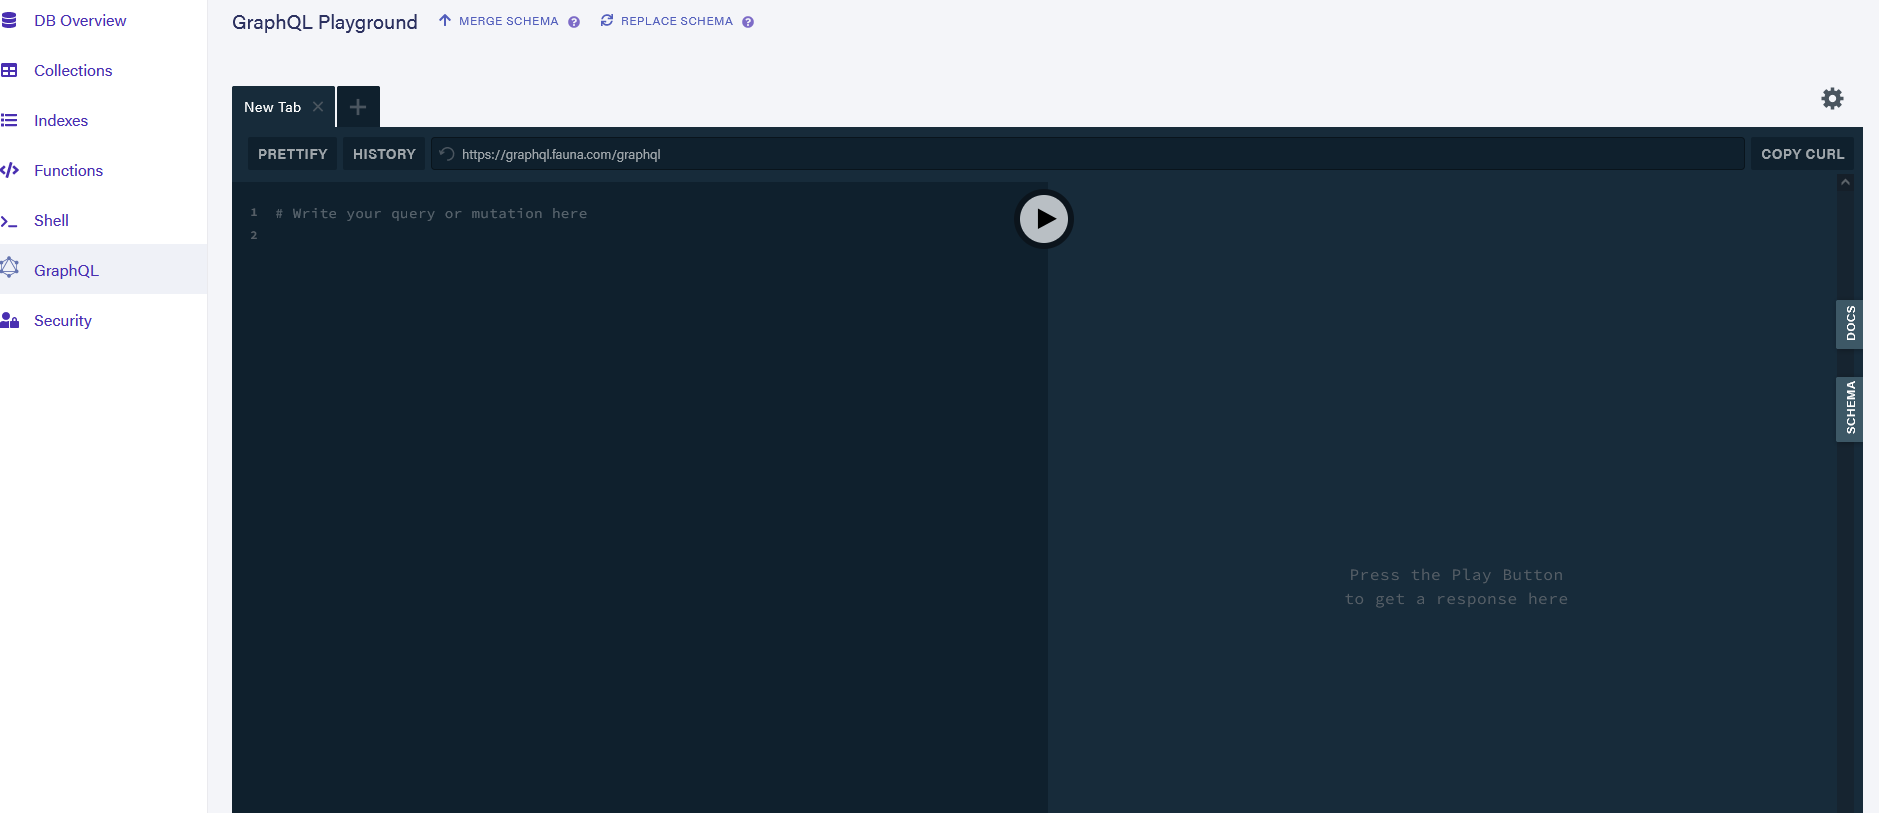
With the schema file updated, head into your Fauna Dashboard and navigate to the project which you named at the start of this article. Then under the GraphQL menu on the sidebar, you should see an interactive editor like this:
Click the Replace Schema button (if you’ve already added a schema, otherwise it might say Import Schema) and upload the schema.gql file we updated earlier.
While we are on the GraphQL page, let’s use the GraphQL playground to create a new item in our Product collection. Paste in the below code in the playground editor to create a new document with the title “Jeans” and a quantity of “11”.
mutation CreateItem {
  createProduct(data:{title:"Jeans", quantity:11}) {
    _id
    title
    quantity
  }
}
After submitting our request either by pushing “Enter” or pressing the play icon in the centre of the playground, you should see a screen similar to below (your _id will be different). Your new document has just been created.
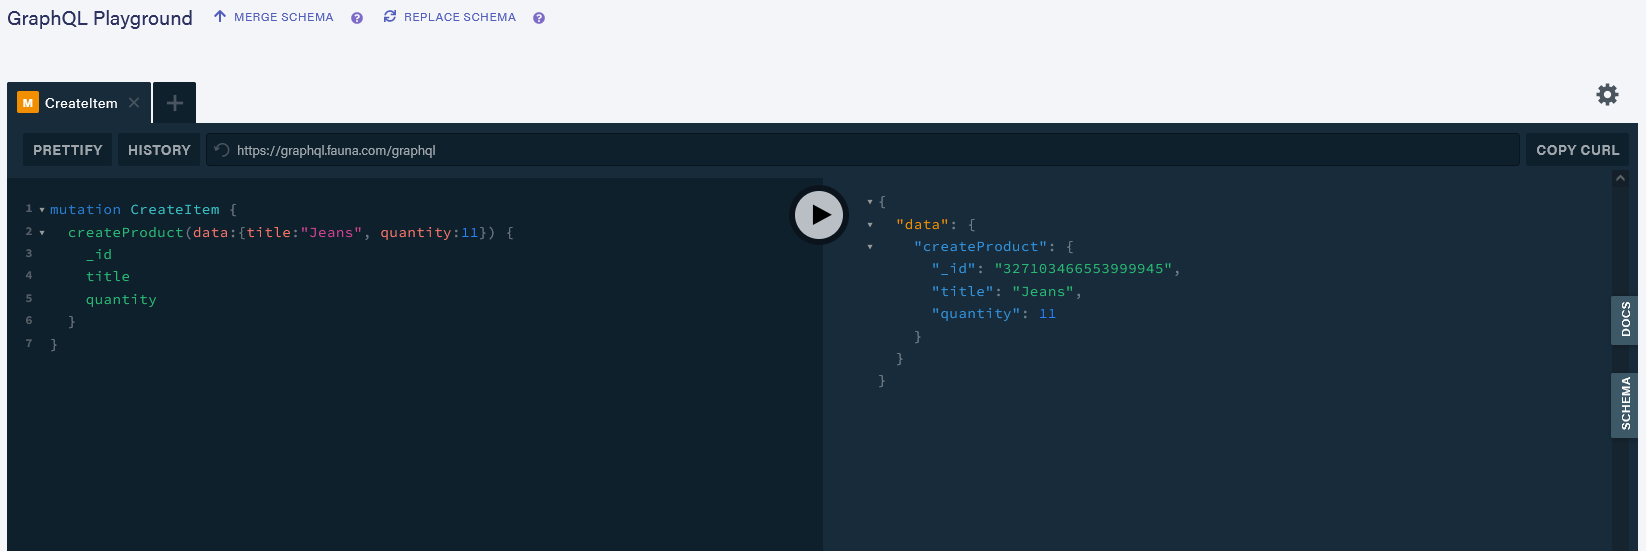
Creating a new document via the GraphQL Playground on Fauna
Once this is completed we can head over to the Collections tab on the sidebar where we’ll see our new collection called Product. Inside of here, we can view all of the documents that have been created.
The final thing we need to do in our Fauna Dashboard is create a new role and key for the Product collection. We’ll use this to regulate how much data we can query from Fauna to prevent unauthorized use.
To do this, head over to the Security tab on the sidebar. Under the Roles subheading, click New Role. Inside of this menu, name the role whatever you wish, select the collection Product that we just created, and assign it the Read, Write, and Create permissions. Then select the index getAllProducts and give it just Read permission. Save your work, then head out to the Keys subheading next to where you chose Roles before. Create a new key, ensuring that the database selected is the one you created earlier in this tutorial. Give the key the role you just created. Once you press Save, you will be shown a secret key — copy this as you won’t be shown it again.
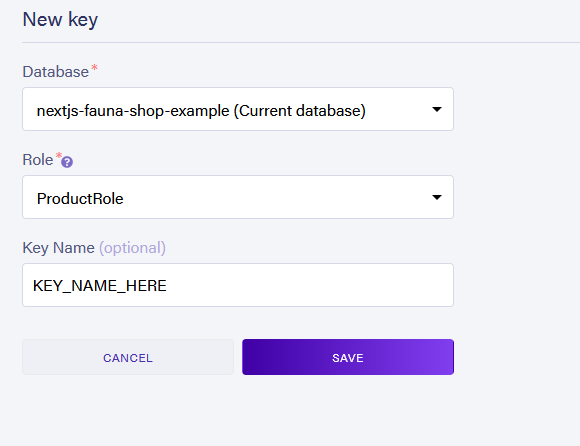
In Fauna, this is where we can create a new key.
With this key copied, head back into your application. Rename the file .env.local.example to just .env.local and add the key you just copied to the file like this:
FAUNA_CLIENT_SECRET=YOUR_KEY_HERE
With this all set up, we are ready to finish building our application with Fauna.
To allow us to query the collection we just created, we need to update our ./lib/fauna.js file to include everything required to query, create, and update data. To do this, replace the existing code in the file with something more like this:
import { GraphQLClient, gql } from 'graphql-request'

const CLIENT_SECRET =
  process.env.FAUNA_ADMIN_KEY || process.env.FAUNA_CLIENT_SECRET
const FAUNA_GRAPHQL_BASE_URL = 'https://graphql.fauna.com/graphql'

const graphQLClient = new GraphQLClient(FAUNA_GRAPHQL_BASE_URL, {
  headers: {
    authorization: `Bearer ${CLIENT_SECRET}`,
  },
})

export const listProducts = () => {
  const query = gql`
    query {
      getAllProducts {
        data {
          _id
          _ts
          title
          quantity
        }
      }
    }
  `

  return graphQLClient
    .request(query)
    .then(({ getAllProducts: { data } }) => data)
}

export const createProduct = (newProduct) => {
  const mutation = gql`
    mutation createProduct($input: ProductInput!) {
      createProduct(data: $input) {
        _id
        _ts
        title
        quantity
      }
    }
  `

  return graphQLClient.request(mutation, { input: newProduct })
}

export const updateProduct = (id, updatedProduct) => {
  const mutation = gql`
    mutation updateProduct($id: ID!, $input: ProductInput!) {
      updateProduct(id: $id, data: $input) {
        _id
        _ts
        title
        quantity
      }
    }
  `

  return graphQLClient.request(mutation, { id, input: updatedProduct })
}
We can now use these exported functions to read and mutate the Product collection within our application.
The next step is a crucial one. Whereas in the monolithic example, our server must be running all the time, here in our Jamstack example, we’ll use serverless functions that’ll spin up, interact with the database, carry out the requested action, and then spin down again.
To configure our serverless functions, add a file called products.js inside of the pages/api directory and paste in the following:
import { listProducts, createProduct, updateProduct } from '../../lib/fauna';

export default async function handler(req, res) {
  const handlers = {
    // If a GET request, return all products
    GET: async () => {
      const entries = await listProducts();

      res.json(entries);
    },

    POST: async () => {
      // If a POST request try to update the product.
      try {
        const {
          body: { title, quantity, id },
        } = req;

        const updated = await updateProduct(id, {
          title,
          quantity,
        });

        res.json(updated);
        // If updating fails, then create a new product
      } catch (e) {
        const {
          body: { title, quantity },
        } = req;
        const created = await createProduct({
          title,
          quantity,
        });

        res.json(created);
      }
    },
  };

  // If not a GET or POST request then return
  if (!handlers[req.method]) {
    return res.status(405).end();
  }

  await handlers[req.method]();
}
This serverless function handles the requests we will send from the frontend. Here’s the logic flow rundown:
- If we get a
GETrequest, we return all of the products retrieved by thelistProducts()function that we defined in ourfauna.jsfile above. - If it is a
POSTrequest, we will first try to update the product using theupdateProduct()function.- If that fails in our
try/catchblock, we will assume the product doesn’t exist and create a new one usingcreateProduct().
- If that fails in our
- Finally, if we get a request that isn’t
GETorPOST, then we will just return from the function without performing any actions.
Now, let’s configure our frontend to consume the serverless functions we just created. To do this, add a couple of extra imports to our index.js file from earlier:
import { listProducts } from '../lib/fauna';
import useSWR, { mutate } from 'swr';
Then we need to update our PRODUCTS_PATH variable from our earlier example to point at our serverless function like so:
const PRODUCTS_PATH = '/api/products';
Now, when we load the page, a GET request is sent off via our serverless function and a list of all the products with their quantities is returned to us to display on the page. However, we could go one step further than this and set up our data to be fetched when the page is rendered during the initial build process with Next.js’ built-in getStaticProps.
Setting this up is actually not as complex as it sounds; we just need to export a new function at the bottom of our page component file and amend some code in our index.js. For the former, add this function above the export default Products but below the main Products component:
export const getStaticProps = async () => {
  return {
    props: {
      initialProducts: await listProducts(),
    },
    revalidate: 1,
  };
};
This is the function that will allow us to fetch the initial list of products and their quantities when the site is generated statically. If you’re wondering how we’re able to access listProducts here, it’s because getStaticProps() is only run on the server when it’s building the site and never on the client. That means we’ve got full use of our fauna.js functions.
With this added in, we just need to update the first few lines of our Products function:
const Products = ({ initialProducts }) => {
  // Bring in the products to display and functions used to update the data.
  const { products, onSubmit } = useProductsFlow({
    initialProducts,
  });

// ...rest of the Products function
This allows us to bring in the data we fetched statically via getStaticProps() to the page and then pass it into our useProductsFlow function.
Let’s do something similar on the first few lines of the useProductsFlow function:
const useProductsFlow = ({ initialProducts }) => {
  const { data: products } = useSWR(PRODUCTS_PATH, {
    initialData: initialProducts,
  });

// ...rest of useProductsFlow function
With this code added in, our site is now set up to use SSG and the Jamstack, prebuilding our data into our application for top performance and maintainability.
Conclusion
In this article, we have compared two approaches to web development:
- A more traditional monolithic application structure using a Node.js server to communicate between our React frontend and a SQL database, and
- A modern approach using the principles of the Jamstack and the power of Fauna, GraphQL, and Next.JS API routes.
As shown throughout this article, we can reuse a lot of the existing code (in particular the frontend) when transitioning to the better approach. We do need to make a few changes to how the data is sourced into our application, but the actual layout and UI of the app remains the same, making it likely that the transition is worth the surprisingly minimal effort for your in-production application.
So if you take away anything from this article, make it this:
Moving your application from a monolithic structure to a Jamstack one isn’t as hard and messy as it may initially seem.
If you want to view the final version of the code, then you can view my GitHub repository here. If you would like to see my version of the site deployed, you can here.
I hope you found this tutorial helpful! If you did and would like to see more JavaScript and Web development related content, check out these links:


