


How to Leverage Fauna and Next.JS to Build a Twitter Account Engagement Application


In this blog post, we are going to be looking at how we can use Fauna, Next.js, GraphQL, and the Twitter V2 API to create a web application that demonstrates everything you need to get started with Fauna and Next.js using GraphQL.
You may be asking, what is Fauna? Fauna is a serverless, transactional, developer-friendly database. It’s a flexible NoSQL database, but also has support for relational data and transactions. And the cherry on the top? Fauna is API-first and serverless-first, so instead of worrying about connection limits, you can just worry about building an awesome application with it! Pair all of the above with the GraphQL API Fauna provides and you have a very capable toolset at your disposal. So, now let’s take a look at how to use this awesome toolset to build an application.
What are we building?
Here are the key things we can do with Fauna that we’ll demonstrate with the application we’re going to build:
- Querying data from Fauna based on a user-provided variable
- Writing data to Fauna
- Updating data on Fauna
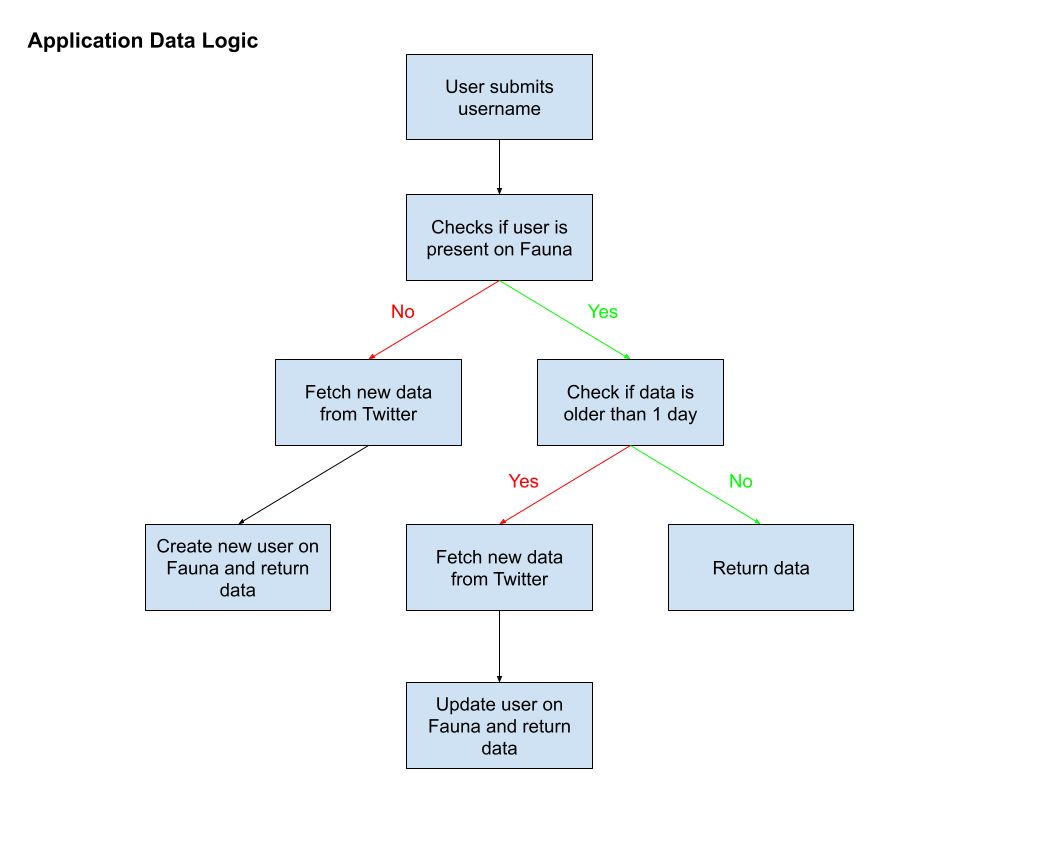
To cover all of these principles, we will be building an application that allows the user to search for a Twitter username. Then we’ll be able to see who that username has interacted with or mentioned in their last 100 tweets sorted by quantity in descending order from highest to lowest.
Now, you could do this just with the Twitter V2 API, but Twitter has quota limits on their API and once you hit it, you’re cut off. This is where Fauna comes into the mix: when someone searches for a username, we will first query Fauna for that username, and if there is a match, return the data. Then, we’ll check the date that the data was last updated, and if it’s more than a day, or if it was never in Fauna at all, we will update Fauna with new data from Twitter. Wherever the data comes from, we’ll display it.
Here is a handy flow chart to show the logic of our application:
Architecture Overview
Before we get into the tutorial, I wanted to take the opportunity to walk through (at a high level) how we will structure our application and how the data will flow between the various aspects of it.
As is usual, we will have our home page live in an index.js file inside of our pages directory and on this page, we will have one component, TwitterForm.js which is what the user will interact with and trigger all of the data queries and mutations to display the data on the home page.
We also have one serverless function in our application, db. This will handle all of the communication between our client-side and the database via a series of queries/mutations. Within this serverless function we will also use a utility function called fetchTwitterData, which will be used to query the new data from Twitter, should it be required.
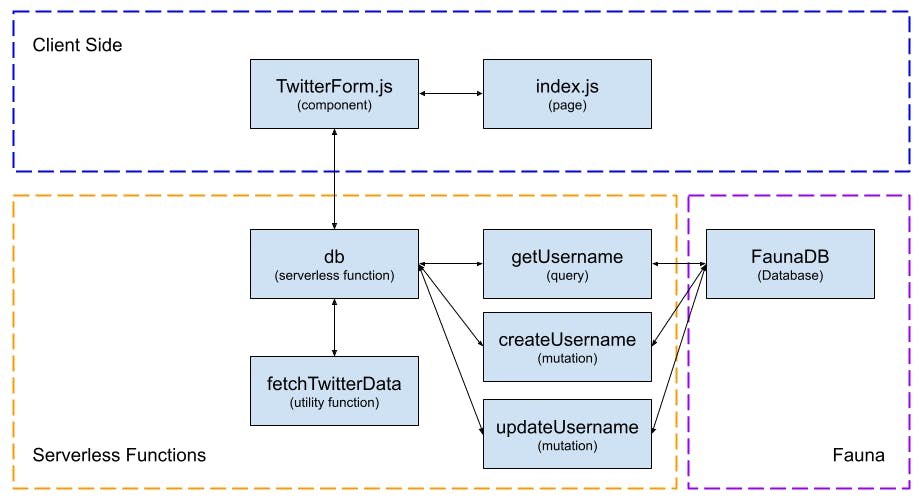
What is not shown is the two pieces of state in our application, both being stored on our home page. The first piece of state, dataToDisplay, is the most crucial and will be responsible for handling the data returned from Fauna and displaying it to the user. The second, statusMessage is purely for information for the user to know what is currently happening.
With all of this covered and with a base understanding of what we will be building today, let’s get started with the setup for the tutorial.
Initial Housekeeping
Before going any further in this tutorial, you will need to have an account with Fauna, so if you don’t already have one, head over to their website and create one. You will also need an account with Vercel as we will be using them to host our site and to leverage their integration with Fauna. This integration lets you get up and running with a Next.js template site that is pre-configured to work with Fauna and their queries with minimal work on our part.
As part of the installation of the template, you will create a new repo on a git hosting site of your choice (I’ll be using GitHub) and most importantly create a new Fauna database. You can call that one whatever you want; I choose to call mine nextjs-fauna-twitter. Once you have the template installed and set up, clone the code to your local machine and npm install.
With the code cloned and the dependencies installed on your local machine, open it up in your favourite IDE — for me this is VSCode. In the root directory of your site, there is a file called .env.local.example. Rename this file to .env.local. This is important because we will be storing our API keys and secrets here. If we didn’t rename the file, then the file would be in our git history. If people had access to the repo, they could get our API keys! By renaming the file to .env.local, git will ignore it since it’s specified in .gitignore, so our secrets are safe.
With this quick bit of housekeeping sorted, hop back into your Fauna dashboard and create a new client API key for you to use locally. To create a new client key, click on the database you just created in your dashboard. Then click on the Security menu on the left-hand sidebar. Before we can create a new key, we need to create a new Role to assign it to. So, in the main panel, click on the Roles subheading and then click New Role.
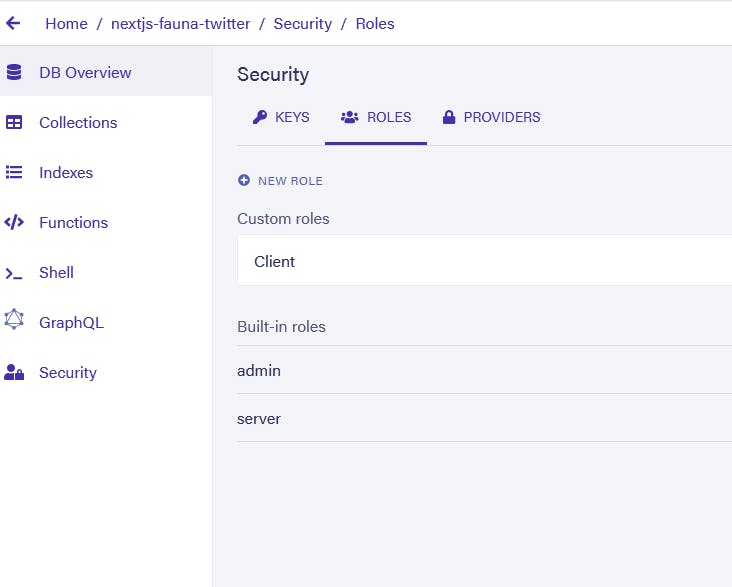
From there, give it a name of your choosing and for now, leave all of the options as default (we will come back and change this later when we have created our schema). For now, just push Save at the bottom of the page. With our new role, we can create a new key. Head over to the Keys subheading next to the Roles one we just used and press the New Key button. Select your database and role, and then give the new key a name of your choice.
Once you push Save, you will be shown your new key. You won’t see this again, so make a copy of it and paste it into .env.local! Call it FAUNA_CLIENT_SECRET. So, your file should like something like this:
FAUNA_CLIENT_SECRET=YOUR_FAUNA_CLIENT_API_KEY_HERE
With our Fauna Client API key sorted, we just need to get our API key for the Twitter V2 API. To get your key for this, head over to the Twitter Developer Portal and sign up for a developer account. Once inside the portal, create a new project and then a new app inside of that project. For this project, I used the Development environment but any of them should work.
Once you have created your new app, head over to Keys and Tokens. Our main concern here is the Bearer Token, as this is what will allow us to use the V2 API instead of V1. Once you have your Bearer Token, we will need to add this to our .env.local file, just like we did for the Fauna API key previously. This time I will store my token in a variable called TWITTER_BEARER_TOKEN. In theory, you could name your variable anything, but this is what I will be using throughout my code. Now, your .env.local file should look something like this:
FAUNA_CLIENT_SECRET=YOUR_FAUNA_CLIENT_API_KEY_HERE
TWITTER_BEARER_TOKEN=YOUR_TWITTER_BEARER_TOKEN_HERE
Lastly, let’s clear out some of the pre-installed files and data from using the template to set up the application. From inside of Fauna, delete all the pre-installed Collections, Indexes, Functions, and any Documents inside of the Collections so you have a completely blank slate to work from when we start developing. Inside of the files we cloned down from GitHub, we need to delete everything inside of schema.gql, fauna.js, pages/index.js. Then delete components/ErrorMessage.js, components/LoadingSpinner.js, components/SuccessMessage.js, and the entries directory inside of pages/api/. Now, we are ready to get started with the development of our application.
Fauna Setup
Now with the front-end of the application largely complete, we can turn our attention to Fauna again and set up our GraphQL schema. I won’t go into too much detail on GraphQL here, but here’s a quick high-level overview:
💡 GraphQL is a typed language. That means it needs to know everything about the data it’s going to receive before it receives it. That includes what data will be sent and what type of data it will be (String, Int, Boolean, etc...)
This is where the schema comes in! The schema defines the types of data we will be working with, as well the queries (reading data) and mutations (writing data) we want to use.
For our application, we need to define our schema in the file schema.gql in the root of our directory. Here’s what that file will look like for us:
# ./schema.gql

type Username {
  username: String
  engagementList: [String]
  createdAt: Time
  lastUpdatedAt: Time
}

type Query {
  getUsername(username: String): Username
}
Currently, by defining the schema locally, only our local application knows about the schema and the types defined within it. Now we need to upload our schema to Fauna so the database is also aware of the data types and queries we’re defining. To do this, head back over to your Fauna dashboard and this time go to GraphQL, under the sidebar at the left. Once you’re on that page, you should see a GraphQL editor appear where you can try out queries and mutations. We’re not interested in this right now, but just above it, notice the Replace Schema button. Push this button and upload the schema.gql file we just edited. If everything goes well, you should get a success message saying the schema has been updated.
You might have been wondering where our mutations are. As I mentioned earlier, we will need mutations to create new users and update old ones when the data is stale, so why do we only have one query defined in our schema? Well, that’s because Fauna does this automatically when you add a GraphQL schema. Take a look at the Docs tab on the right of the GraphQL editor — you should now see a list of three mutations in there: createUsername, updateUsername and deleteUsername. We didn’t define these, but Fauna automatically created these mutations based on the Username type we declared in the schema.gql file! We can use these mutations just as if we had defined them explicitly.
But, before we can query any data in our application, we need to assign roles to the client API key we created earlier in this article. To do this, go to the Security tab again in your Fauna dashboard and then to the Roles subheading. Click on the cog icon to the right of the name of the role you created earlier. We were here earlier, but now we’ll populate those dropdown menus. First, in the Collection dropdown menu, click on the Username collection we added, then grant the permissions to read, write, and create. Then in the Indexes dropdown, click on the index getUsername to add it and then grant the read permission to it.
Now, we can finally get into the meat of this article and look at consuming Fauna data in our Next.js application.
Consuming Fauna
As we will be using serverless functions for fetching data from our Fauna database, we need to add a small file called config.js in the root directory of our project. This file will contain a ternary variable that sets the base URL of the website based on whether we are running the code in development or production. This is to resolve an issue that I encountered early on which was that node-fetch, the HTTP requests library used by the server, doesn’t know what domain we’re running on, so it doesn’t understand relative URLs. To deal with this, we need to create a quick config file to help the server always know what our root domain is.
Here is the code for my implementation, but you will need to update your Vercel URL with the one you have been given by Vercel which you can get from your Vercel dashboard here.
// ./config.js

const dev = process.env.NODE_ENV !== 'production';

export const server = dev
  ? '<http://localhost:3000>'
  : '<https://nextjs-fauna-twitter.vercel.app/>';
With this small piece of housekeeping out of the way, we can look at adding queries to our application and creating the logic to support it in our serverless function, db.
To run a query, we need to define and export it from our ./lib/fauna.js file that we cleared out earlier. This is where we will be using the FAUNA_CLIENT_SECRET environment variable we created earlier: to authenticate with Fauna and allow us access to our Username collection we created.
Here is the complete code for our queries/mutations in our application.
// ./lib/fauna.js

// Import required depenencies from graphql-request
import { GraphQLClient, gql } from 'graphql-request';

// get client secret from env file for authenticating with Fauna
const CLIENT_SECRET =
  process.env.FAUNA_ADMIN_KEY || process.env.FAUNA_CLIENT_SECRET;

// Fauna GraphQL API endpoint
const FAUNA_GRAPHQL_BASE_URL = 'https://graphql.fauna.com/graphql';

// Creating our graphQL client for performing authenticated queries with Fauna
const graphQLClient = new GraphQLClient(FAUNA_GRAPHQL_BASE_URL, {
  headers: {
    authorization: `Bearer ${CLIENT_SECRET}`,
  },
});

// Query to get data from Fauna based on given username
export const getUsername = async (usernameToLookup) => {
  const query = gql`
    query GetUsername($data: String) {
      getUsername(username: $data) {
        _id
        username
        engagementList
        createdAt
        lastUpdatedAt
      }
    }
  `;

  const { getUsername: data } = await graphQLClient.request(query, {
    data: usernameToLookup,
  });
  return data;
};

// Mutation to create new data on Fauna
export const createUsername = async (data) => {
  const mutation = gql`
    mutation CreateUsername($data: UsernameInput!) {
      createUsername(data: $data) {
        _id
        username
        engagementList
        createdAt
        lastUpdatedAt
      }
    }
  `;

  const { createUsername: createdUserData } = await graphQLClient.request(
    mutation,
    { data }
  );
  return createdUserData;
};

// Mutation to update existing data on Fauna
export const updateUsername = async ({ data, id }) => {
  const mutation = gql`
    mutation UpdateUsername($data: UsernameInput!, $id: ID!) {
      updateUsername(data: $data, id: $id) {
        _id
        username
        engagementList
        lastUpdatedAt
        createdAt
      }
    }
  `;

  const { updateUsername: updatedUserData } = await graphQLClient.request(
    mutation,
    { data, id }
  );
  return updatedUserData;
These are all of the queries/mutations we will need to run in our application.
getUsernameto retrieve data based on a username passed in from the form.createUsernameto create new data on the databaseupdateUsernameto update old data on the database.
But, before we get too excited and carried away, we can’t query the data in our application yet! We still need to define our db serverless function to handle the sending and receiving of the data from Fauna.
I won’t go into details about serverless functions in Next.js, so if you’re interested in learning more about them you can check out the Vercel documentation on deploying serverless functions or the Next.js documentation on API routes.
To create a new serverless function, add a new folder into our empty ./pages/api/ folder that we cleared out at the start of this article. This new folder’s name will be the name of our serverless function. It can in theory be anything you would like, but I will be using db.
Inside of our new ./pages/api/db folder, create a new file called index.js. This is where we will define all of the logic for our serverless function and handle the sending of queries/mutations to Fauna and return the data to the client who requested it from the serverless function.
// ./pages/api/db/index.js

import { differenceInCalendarDays } from 'date-fns';
import fetchTwitterData from '../../../utils/fetchTwitterData';
import {
  getUsername,
  createUsername,
  updateUsername,
} from '../../../lib/fauna';

export default async function handler({ query, method }, res) {
    // right now, we don't really need this object of handlers
    // we're just accepting post requests
    // but one day, we might like to accept update or delete requests
    // so we'll organize it like this to make our future selves happy

  const handlers = {
    GET: async () => {
      // 1. Destructure query parameters from the request
      const { username } = query;

      // 2a. Fetch the username from Fauna
      const initialData = await getUsername(username);

      // 2b. If initialData is not null then check if it's out of date.
      if (initialData) {
        // 2b. Check if lastUpdated date is more/less than 1 day
        if (
          differenceInCalendarDays(
            new Date(),
            new Date(initialData.lastUpdatedAt)
          ) > 1
        ) {
          // 2c. If more than 1 day, update data.
          const updatedData = await updateUsername({
            data: {
              username,
              engagementList: await fetchTwitterData({ username }),
              lastUpdatedAt: new Date(),
            },
            id: initialData._id,
          });
          res.json(updatedData);
          return;
        }
        // 2d. Return initialData if newer than 1 day.

        res.json(initialData);
        return;
      }

      // 3a. If initialData is null, create new data on Fauna.
      res.json(
                await createUsername({
            username,
            engagementList: await fetchTwitterData({ username }),
            createdAt: new Date(),
            lastUpdatedAt: new Date(),
          })
            );
    },
  };

  // if we dont have a handler for this, return a 405
  if (!handlers[method]) {
    return res.status(405).end();
  }

  // await any handler function if we have an appropriate one
  await handlers[method]();
}
In this file we export our serverless function called handler from our file, this is where all the magic happens so let’s take a closer look.
A serverless function can take in 2 parameters req (your request) and res (your response). From the request parameter, we take the request method and the query which contains the data we passed.
If the method isn’t a GET request then we return the request with a 405 error. Otherwise, we handle the request by first trying to query for the data in Fauna using getUsername if data is returned then we move on to step 2 which is checking if it’s out of date.
If the lastCheckedAt property within the initialData returned is more than 1 calendar day behind today then we call updateUsername to update the data. If it’s less than 1 calendar day then we return the data as-is.
If null is returned from the initial getUsername query then we skip to creating new data using createUsername.
Reaching out to Twitter
In the last section, we defined our queries to Fauna. Of these, our create and update queries utilised our fetchTwitterData utility function which fetches the relevant data from Twitter.
Here is a quick overview of how this function works: we pass in a Twitter username, query the Twitter API to find out their unique ID number, retrieve the last 100 tweets for that ID, and then perform some data analysis on the tweets. We find the most common usernames in the data, sort them, and then return them to be stored in Fauna by the other function.
const bearerToken = process.env.TWITTER_BEARER_TOKEN;
const authorsEndpoint = 'https://api.twitter.com/2/users/by?usernames=';

async function fetchData(endpoint, userAgent) {
  const { data, includes } = await fetch(endpoint, {
    method: 'GET',
    headers: {
      'User-Agent': userAgent,
      authorization: `Bearer ${bearerToken}`,
    },
  }).then((res) => res.json());

  return { data, includes };
}

// eslint-disable-next-line
const regexp = /\@(?=.*[a-z0-9_])(?!.*[A-Z])\w+/g;

export default async function fetchTwitterData({ username }) {
  // 0. Remove the @ symbol from the username passed in
  const usernameToLookup = username.replace('@', '');

  // 1. Fetch the userID of the username searched
  const authorEndpointToFetch = `${authorsEndpoint}${usernameToLookup}`;

  // 2. Get the twitter userID of the username given
  const { data: userData } = await fetchData(
    authorEndpointToFetch,
    'v2UserLookupJS'
  );
  const [{ id }] = userData;

  // 3. Construct the Twitter API endpoint required for looking up tweets of a user
  const tweetsEndpoint = `https://api.twitter.com/2/users/${id}/tweets?max_results=100`;

  // 3a. Fetch the data and wait for it.
  const { data } = await fetchData(tweetsEndpoint, 'v2UserTweetsJS');

  // 4. Transform the data returned from Twitter to count the mentioned usernames in all the tweets and sort from highest to lowest.
  const mentionedUsers = data
    .reduce((acc, cur) => {
      const { text } = cur;

      // 4a. Using the regex on line 17, find all the usernames in the tweets and combine them into one array.
      const usersInTweet = [...text.toLowerCase().matchAll(regexp)].flat();

      usersInTweet.map((user) => {
        // 4b. If the username is the one we looked up, return and discard it.
        if (user === username) return;

        // 4c. See if the user has already been counted before and is present.
        const userInArray = acc.find((item) => item.username === user);

        // 4d. If the user has been counted before, increment the count by 1, if not add it with a count of 1
        if (userInArray) {
          return (userInArray.count += 1);
        }
        return acc.push({ username: user, count: 1 });
      });

      return acc;
    }, [])
    // 5. Sort the array from highest to lowest counts
    .sort((a, b) => b.count - a.count)
    // 6. Map over the array of objects, to just return the usernames
    .map((item) => item.username);

  // 7. Return the data
  return mentionedUsers;
}
Creating Frontend Layout & Styling
Let’s now build the front-end of our application to consume the functionality we just set up. Here is the base layout of our home page (pages/index.js):
Note: I use the package styled-components for styling throughout this tutorial. I won’t cover the styling but will provide the code I use for the styling. It’s not intended to be a work of art but rather functional.
// ./pages/index.js

import Head from 'next/head';
import styled from 'styled-components';

const Container = styled.main`
  text-align: left;
  font-family: Roboto, Oxygen, Ubuntu, Cantarell, 'Helvetica Neue', sans-serif;

  button,
  input {
    font-family: Roboto, Oxygen, Ubuntu, Cantarell, 'Helvetica Neue', sans-serif;
  }

  .pageHeaderContainer {
    background-color: #cbd5e1;
    border-radius: 20px;
    padding: 2rem 5rem;

    h1 {
      width: fit-content;
    }

    p {
      max-width: 600px;
    }
  }
`;

const DataDisplayContainer = styled.div`
  display: flex;
  flex-direction: column;
  align-items: flex-start;
  margin: 0 5rem;

  p,
  li {
    font-size: 18px;
  }

  .engagementLabel {
    font-weight: bold;
  }

  ol {
    width: 100%;
    display: grid;
    grid-template-columns: repeat(auto-fit, minmax(300px, 1fr));
    margin: 0;
    padding: 0;

    li {
      text-align: left;
      margin: 0.5rem 0;
    }
  }
`;

const AppHead = () => (
  <Head>
    <meta name="viewport" content="width=device-width, initial-scale=1" />
    <meta charSet="utf-8" />
    <link rel="icon" type="image/x-icon" href="/static/favicon.png" />
  </Head>
);

function Home() {
    // State definitions
    const [dataToDisplay, setDataToDisplay] = useState();
  const [statusMessage, setStatusMessage] = useState(
    'Please enter a Twitter username to lookup.'
  );

  return (
    <Container>
      <AppHead />
      <div className="pageHeaderContainer">
        <h1>Twitter Account Engagement Lookup</h1>
        <p>
          Put in a Twitter account handle (e.g. @mrconermurphy) into the form
          below to see who they've engaged with the most recently.
        </p>
        <p>
          <b>Status Message:</b> {statusMessage}
        </p>
      </div>
            {/* Section for displaying data from fauna, if present */}
            {dataToDisplay ? (
        <DataDisplayContainer>
          <h2>Engagement data for {dataToDisplay.username}</h2>
          <p>
            <span>{'Data created on '}</span>
            <b>{`${formatDate(
              new Date(dataToDisplay.createdAt),
              'd MMM yyyy'
            )}`}</b>
            <span>{' | Data last updated on '}</span>
            <b>{`${formatDate(
              new Date(dataToDisplay.lastUpdatedAt),
              'd MMM yyyy'
            )}`}</b>
          </p>
          <p className="engagementLabel">Most Engagement</p>
          <ol>
            {dataToDisplay.engagementList.map((person) => (
              <li key={person}>{person}</li>
            ))}
          </ol>
          <p className="engagementLabel">Least Engagement</p>
        </DataDisplayContainer>
      ) : null}
    </Container>
  );
}

export default Home;
Alongside creating our home page, we have also created two pieces of state, dataToDisplay and statusMessage that we mentioned at the top of the article.
With the home page done, let’s now define the TwitterForm component that will allow us to query the data on Fauna with the functionality we implemented earlier in this post.
// ./components/TwitterForm.js

// Two new imports at the top of the file
import fetchRequest from '../utils/fetchRequest';
import { server } from '../config';

// ... styles omitted for brevity ...

// Absolute URL path for querying.
const DB_PATH = `${server}/api/db`;

export default function TwitterForm({ updateData, setStatusMessage }) {
  const { values, updateValue } = useForm({
    twitterHandle: '',
  });

  const { twitterHandle } = values;

  async function handleSubmit(e) {
    e.preventDefault();

    setStatusMessage('Looking up Twitter username...');

    const dbResponse = await fetch(`${DB_PATH}?username=${twitterHandle}`);
    const data = await dbResponse.json();

    updateData(data);
    setStatusMessage('Look up complete.');
  }

  return (
    <FormContainer onSubmit={(e) => handleSubmit(e)} action="submit">
      <input
        aria-label="Please enter a twitter username"
        placeholder="@mrconermurphy"
        name="twitterHandle"
        value={twitterHandle.trim()}
        onChange={updateValue}
        // Regex to ensure the input matches: starting with @, contains only lowercase letters, numbers and _
        pattern="@(?=.*[a-z0-9_])(?!.*[A-Z])\w+.*"
        type="text"
        title="Please enter a Twitter username starting with @ and lowercase. E.g. @mrconermurphy"
        required
      />
      <input type="submit" value="Lookup username" />
    </FormContainer>
  );
}
The component itself is a pretty standard form with one input and a button for submitting. We do some regex validation on the input to ensure it meets our criteria for submission but the important part is the onSubmit handler.
The function that handles onSubmit for us takes the current twitterHandle in state and submits a GET request to our serverless function db.
Once db has resolved and completed the relevant action for the query (fetching existing data, updating data, or creating new data), the data is returned to this function and then the new data is set to state using our updateData() function passed via props.
We also set a couple of status messages using the setStatusMessage() hook on either side of our fetch request to inform the user of what is going on with their request.
With the component defined, let’s now add it to our home page:
function Home() {
  // State definitions
  const [dataToDisplay, setDataToDisplay] = useState();
  const [statusMessage, setStatusMessage] = useState(
    'Please enter a Twitter username to lookup.'
  );
  return (
    <Container>
      <AppHead />
      <div className="pageHeaderContainer">
        <h1>Twitter Account Engagement Lookup</h1>
        <p>
          Put in a Twitter account handle (e.g. @mrconermurphy) into the form
          below to see who they've engaged with the most recently.
        </p>
                {/* New TwitterForm component added and state passed */}
        <TwitterForm
          updateData={setDataToDisplay}
          setStatusMessage={setStatusMessage}
        />
        <p>
          <b>Status Message:</b> {statusMessage}
        </p>
      </div>
      {/* Section for displaying data from fauna, if present */}
      {dataToDisplay ? (
        <DataDisplayContainer>
          <h2>Engagement data for {dataToDisplay.username}</h2>
          <p>
            <span>{'Data created on '}</span>
            <b>{`${formatDate(
              new Date(dataToDisplay.createdAt),
              'd MMM yyyy'
            )}`}</b>
            <span>{' | Data last updated on '}</span>
            <b>{`${formatDate(
              new Date(dataToDisplay.lastUpdatedAt),
              'd MMM yyyy'
            )}`}</b>
          </p>
          <p className="engagementLabel">Most Engagement</p>
          <ol>
            {dataToDisplay.engagementList.map((person) => (
              <li key={person}>{person}</li>
            ))}
          </ol>
          <p className="engagementLabel">Least Engagement</p>
        </DataDisplayContainer>
      ) : null}
    </Container>
  );
}
With the new TwitterForm component defined and added to our home page, the development of our site is now complete and we should be able to:
- Query Fauna based on the Twitter username we pass in.
- If the username exists but the data is out of date, update it.
- Finally, create new data if no data with that username exists.
All that is left for us to do is deploy the site to Vercel and share it with the world.
Deploying to Vercel
For me, while running the command npm run build locally to build the site, I was getting errors. After some investigation, I found that in the package.json, the build command is prefixed to run yarn setup. After I removed yarn setup && from the build script, the site was built with no issues. Your build script should be:
"build": "next build",
With our site building locally, we just need to get our Vercel environment prepped by adding our Twitter API Key into the environment variables on Vercel. We don’t need to worry about adding our Fauna client key to Vercel because when we used the template, it automatically added our admin key to Vercel.
To add your Twitter API key to your Vercel site, go to your Vercel dashboard and then click on the site. From there click on the ‘Settings’ subheading at the top of the screen and then ‘Environment Variables’ on the left-hand side. Then you can type in the name of the environmental variable and paste in the value beneath that. If you called your Twitter environmental variable the same as me in your .env.local file it should be called TWITTER_BEARER_TOKEN.
Once, you’ve copied and pasted in the values, press ‘add’ and you should be good to go. Now, just commit all your local changes and push them to GitHub. Vercel should then start rebuilding your site and deploying it to the URL they have given you.
Conclusion
Phew, that was a lot of things we just covered. In this article, we developed a site that can fetch, create, and update data from a Fauna database using data from the Twitter V2 API. If you want to view the final version of the code, then you can view my GitHub repository here. If you would like to see my version of the site deployed, you can here.
I hope you found this tutorial helpful! If you did and would like to see more JavaScript and Web development related content, check out these links: